How to remove heater and air conditioning unit from a VW Polo 6R


1 – Dash panel cross member
2 – Hexagon combi-bolt
- Qty. 2
- 5 Nm
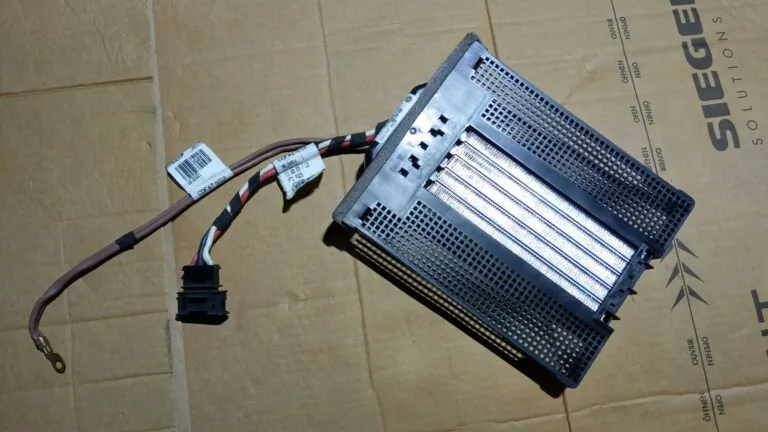
3 – Heater unit
Removing:
First carry out the following work:
– Remove dash panel cross member
– Cover floor carpeting at front.
– Seal coolant hoses in engine compartment and remove from heat exchanger
– Seal coolant hoses in engine compartment and remove from heat exchanger
– Carefully blow compressed air through heat exchanger.
Installing:
– Install in reverse order.
When doing this, ensure bolt -5- is tightened before bolts -4-.
– Replenish coolant on completion of installation
4 – Hexagon combi-bolt
- Qty. 2
- 5 Nm
- Observe tightening sequence.
5 – Hexagon combi-bolt
- 5 Nm
- Observe tightening sequence.
6 – Gasket between heat exchanger and plenum chamber bulkhead
- Note installation position

Remove refrigerant lines
Expansion valve, function and removal
Function of expansion valve
The expansion valve atomises incoming refrigerant and regulates the flow so that, depending on the heat transport, the vapour does not become a gas until it reaches the outlet of the evaporator.
The refrigerant must be extracted beforehand, e.g. with air conditioner service station -VAS 6007A-.
Releasing refrigerant into the environment is a punishable offence.
If refrigerant circuit has not been evacuated, refrigerant will escape.
Extract refrigerant before opening refrigerant circuit. If the refrigerant circuit is not opened within 10 minutes after it has been evacuated, pressure may develop in coolant circuit due to re-evaporation. Extract refrigerant again.
To prevent the intrusion of moisture, all components of the refrigerant circuit which have been opened must be sealed with suitable plugs.
1 – Gasket between evaporator housing and plenum chamber bulkhead*
2 – O-ring
- 11.10 mm; 1.78 mm
3 – Expansion valve
- Aperture must be sealed against splashed water.
Removing
First carry out the following work:
- First evacuate refrigerant circuit using e.g. air conditioner service station -VAS 6007A-. Then – and only then – open refrigerant circuit.
- Remove bolts -8-.
- Pull out refrigerant line -5- and refrigerant hose -6-.
- Renew O-rings -4- and -9-.
- Remove bolts -7-.
- Remove expansion valve -3-.
- Renew O-rings -2- and -10-.
4 – O-ring
- 10.8 mm; 1.82 mm
5 – Refrigerant line
- From receiver with dryer cartridge to expansion valve.
6 – Refrigerant hose
- From expansion valve to air conditioner compressor.
7 – Socket head combi-bolt
- 5 Nm
8 – Bolts
- 12 Nm
- Qty. 2
9 – O-ring
- 14.30 mm; 2.40 mm
10 – O-ring
- 17.17 mm; 1.78 mm


9 – Socket head bolt with hexagon socket head, M8X28N10414402 (N 104 144 02)
18 – A/C Line O-Ring 10.8 x 1.8 mm8E0260749 (8E0 260 749)
25 – A/C Line O-Ring 14.3×2.4 mm7H0820898 (7H0 820 898)
Unscrew and carefully remove the refrigerant hoses.
There is socket head bolt with hexagon socket head on each hose (M8X28):

N10414402 (N 104 144 02)


When removing the hoses, the old seals (o-rings) may be damaged, but don’t worry – they cost a pittance and it’s recommended to use new seals every time, when you remove them.


It is very important that the seals are in perfect condition, because when they are damaged, our air conditioning system will not pass the vacuum tests (which is performed before filling with the refrigerant 134a).
Now it’s best to temporarily attach the A / C aluminum tubes so they don’t get in the way of removing the rubber hoses (at the bottom).


Now put some rag under the coolant hoses.
You will also need a bowl or other container to which you will pour coolant later.
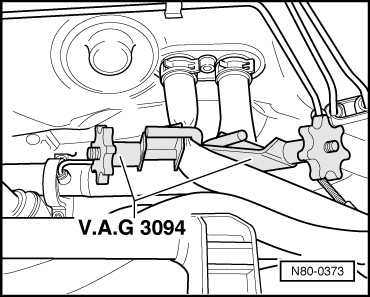
Remove coolant hoses from heater unit
- Clamp off coolant hoses using hose clamps up to 25 mm -3094-.
WARNING
Danger of scalding injuries.
When the engine is warm, the coolant temperature may be above 100 °C. The cooling system is pressurised.
If necessary, release pressure and reduce temperature before carrying out repairs.
- Release spring-type clips and pull water hoses off.
- Unscrew coolant pipes (9 ± 1.3 Nm) -arrow- and renew seals.

Installation position of gasket between heat exchanger and plenum chamber bulkhead
– Fit gasket -1- first on heat exchanger flange -2- and then insert in plenum chamber bulkhead. Ensure that seal sits correctly in groove -arrows-.
– Connect coolant hoses (do not interchange).
– Supply -3-.
– Return -4-.
Note
If heat exchanger is renewed, renew entire coolant.
– Check coolant level and top up if necessary.

Drain coolant
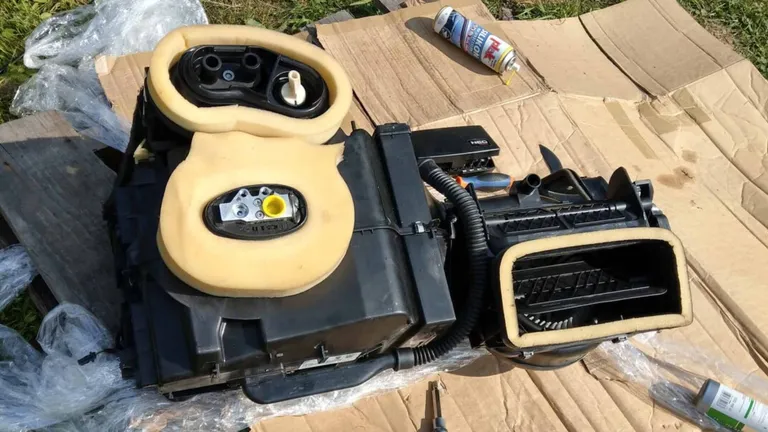
In my case, I changed the heater without any special tools – I just did it in my garage so I didn’t use the VAG 3094 hose clamps and instead poured the remnants of the heater fluid into a mineral water bottle.
Access to the hoses is quite difficult, so initially I tried to remove the zip ties from the inside (passenger side), but there was also too little space there.


Therefore, I eventually had to pull them out from the engine side. I used a regular home pipe wrench to remove the ties.


Now you can remove heater unit, so get in the car!
Remove heater unit


1J0972775 (1J0 972 775)T10c is the connector between engine bay and interior, next to the fan.
You will not need it anymore if you install Climatronic instead of Manual heater unit ; -)
T10c = Manual AC
T10z = Climatronic AC
You don’t need to remove heater wiring harness from heater (but you can separate wiring to have cables for other mods)